Saturday, 23 September 2017

Crystal Ball Tutorial


crystal ball halloween prop tutorial


I'm planning to dress as a fortune teller this halloween so I'm in need of a crystal ball. Here's how I made it. You will need:

Crystal Ball
Spherical light (I used a solar powered garden light from Bargain Buys which I picked up for £1)
LED battery powered lights (colour changing ones would look even better)
Clingfilm
Blue and black tulle pieces (you could probably also use tissue paper or coloured cellophane)
Purple fake spider web (again you can subsitute anything coloured and somewhat see through)

Base
Foil (I used hair foil which is a bit thicker than aluminium foil - although regular foil should still work)
Cardboard
Astrology print out (or you can draw your own symbols - I mostly drew my own because it was much easier)
Acrylic paints (I used bronze and brown) and paintbrushes
PVA glue
Paper towel
Hot glue gun and glue sticks
Pipe cleaners
Stick on beads (You can use whatever you like to make the shapes - I just had these to hand) and any decorations you want to add (I used a plastic snake and a tiny horseshoe)
Ready mixed plaster (you might not need this if your cardboard is thick enough)

Garden light thingy

I cut out the astrology circle thing and stuck it to some cardboard. Then I cut the centre out.
I had planned to recreate the symbols using hot glue, or pipe cleaners, or something. It didn't work very well so I mostly just used the sticky gems instead.

I used pipe cleaners for the segments. I just wrapped them around the carboard and twisted them at the back.
Stick down beads or whatever you have to form the symbols.

Brush on a layer of PVA glue

Cover with a layer of foil


Gently smooth and press the foil in between the beads and pipe cleaners until you can see their shapes more clearly. I rushed this part and had a few splits in the foil. Let's hope the paint covers them up!

The hair foils come in a roll, if you use tinfoil just cut a big enough piece to cover the circle in one go

Wrap the foil around the back of the circle and keep pressing and smoothing
You can use a cotton bud to gently hammer out any air bubbles. You want the foil to be as compressed and tight against the cardboard as possible.

The cardboard felt a bit flimsy so I smudged a layer of plaster on the back and left it to dry
Brush on a layer of brown acrylic paint

While it's still wet, dab off most of the paint with a paper towel

Once it had dried I did the same with some bronze paint
Stuff some climgfilm and spider web stuff inside the sphere
Push in some of the lights

Add a bit of tulle
It took a few attempts to get the lights and coloured pieces exactly how I wanted them, so turn the LED lights on and check you're happy with the placement as you go.

Cut
You could measure the diameter of the astrology circle then times that by pi to find out how long a piece of cardboard you need. Obviously that's way too much work, so I just eyeballed it. 


I cut at rough intervals, rolled the carboard into a tube and secured it with doublesided tape

Fold the teeth things down. Your circle and ball are going to sit on top

Repeat the painting steps to get a metallic effect
Feed the LED batteries through the hole

Glue the circle thingy to the base thingy

I didn't like the messy edge (yes sometimes measuring would be worth the effort) so I glued on some silver leaves


And a happy little snake

I found a tiny horseshoe so I glued that on too and dry brushed it with the bronze paint
 
crystal ball halloween prop tutorial
Finished!


Monday, 18 September 2017

Free Calendar Printable

My diary is so busy (and I'm so forgetful) that I've started printing out my own A3 calendar and sellotaping it to my wardrobe door. Yeah, I'm not fancy.
 
In case you have equally hectic schedules, here's a free Sloth calendar for October.
 
Just click here to download a printable pdf.
 

Sunday, 17 September 2017

Pressed Flowers Picture Frame & Giveaway


I got a couple of these cute little frames from Oliver Bonas in Bristol last week, now it's time to put something pretty in them. (You can win this frame - details are at the end of this post).


It takes weeks to press flowers the proper way - screw that! You Tube and Pinterest obliged with numerous methods of drying flowers in amicrowave instead, so here's my first attempt.

Cut your clean and dry flowers and lay them out on some white paper (they stick to kitchen roll and to each other so space them out) fold the paper over and slide it inside some folded over kitchen roll.

Lay out flowers then fold the paper in half


Slide the paper in between a folded sheet of kitchen roll

I weighed mine down with a flat bottomed ceramic dish but a plate will probably work too
Microwave them in 30 second bursts for about a minute (different flowers will take more or less time - keep an eye on them or they'll start to brown).


Once they're dry and flat you can open up your frames and place them as you please. Close up the frame and the flowers are held in place. That's it. Enjoy 😀


You can win this very frame by subscribing to my blog (just put your email into the Subscribe Box on the home page) or you can get an entry into the draw by liking and sharing the Facebook post. (Or do both and get two entries!)

A winner will be announced in the comments below and on the Facebook post around midday on 1st October 2017.

Monday, 11 September 2017

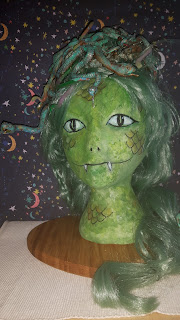
The Incredible Snake Faced Lady


For my CarnEvil Halloween party I want a few old fashioned freakshow exhibits, like the Incredible Snake Faced Lady.

You will need:

Polystyrene head (you can get these for a few pounds on Ebay)
Paper mache (newspaper or similar and PVA glue)
Acrylic paint (green, yellow, white and bronze) and brushes
Ready mixed wall filler  and sandpaper (this stage is optional)
Sharpie pen (black) or permanent marker
Wig, flexible toy snakes and hair pins (I used a wig which I'd altered a few years ago for a Medusa costume)


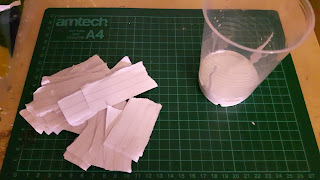
Cover the head with paper mache using watered down glue (70% glue 30% water). Try to smooth the edges as much as possible and use small pieces around the facial features (I went on to use wall filler on top of the paper mache so I've no idea if you can just skip the paper mache steps).

I used small strips of note paper


I did two layers of paper mache then left it to dry. Then I got bored waiting and used a hairdryer to speed up the drying time instead.

I started to paint the head to cover the lines on the paper I used.  After 2 coats of paint, I decided this wasn't going to work well enough and coated the entire head in a thin layer of ready-mixed wall filler (thinned with a little water) and left it to dry again, before lightly sanding all over the head.

Lightly draw cross hatched lines over parts of the head where you want scales to appear. I chose the cheeks, forehead and neck.

Pencil in some scales.

Water down some green acrylic paint and roughly brush it over the entire head - you should be able to see the pencilled scales through the paint. Trace over the scales with a sharpie pen.

I forgot to take pictures before I started painting!


Cover the head in a rough diluted mix of green/yellow paint
and pencil in the scales, mouth and eyes

Use a Sharpie pen to trace over the eyes, mouth and scales and add some little nostrils


Paint the whites of the eyes with acrylic


I dabbed on splodges of green and yellow paint

Then blended them together


I added a little bronze colour to the scales

And painted the teeth white
 
Get you a snake wig
I used a green wig that I bought on Ebay a few years ago, to which I had hot glued dozens of rubber snakes. I think I made a fake bun on top of the head (using tights), pinned it using hair grips and then piled the snakes on top. You can probably find some tutorials for similar wigs online.


And that's it. Enjoy!